Proper roof ventilation removes excess moisture and heat from your attic, preventing mold, premature roof failure, and unnecessarily high energy bills. In the Pacific Northwest, ventilation matters more than in most regions because of constant moisture from 150+ rain days per year. A balanced system using ridge vents for exhaust and soffit vents for intake is the most effective setup for most Seattle-area homes.
Most national ventilation guides treat the topic as a heat management problem. That framing misses the point in western Washington. Here, ventilation is a moisture management system first, and getting it wrong can cut your roof’s lifespan in half.
Why Roof Ventilation Matters More in the Pacific Northwest
Ventilation guides written for national audiences focus on heat. Hot attics in Phoenix and Houston bake shingles from below and drive up summer cooling costs. That is a real problem in those climates, but it is not what threatens Seattle roofs.
In western Washington, the threat is moisture. We get 150+ days of rain a year, often as light, sustained drizzle that keeps surfaces damp for weeks. Indoor humidity from showers, cooking, laundry, and breathing rises into the attic through air leaks. When that warm, moist air hits the cold underside of the roof deck, it condenses into water droplets.
Without ventilation, that moisture has nowhere to go. It soaks into the sheathing, drips onto insulation, and creates ideal conditions for mold. Over time, it warps the deck, rusts fasteners, and rots the framing. Your shingles look fine from the curb, but the roof is dying from underneath.
Worse, the PNW’s mild temperatures actually make this problem harder to solve. Hot, dry climates “bake out” attic moisture during summer. Seattle attics rarely get that hot. Moisture accumulates and stays.
Types of Roof Ventilation Systems Compared
Six common ventilation options, each with different strengths.
Ridge Vents
A continuous vent installed along the peak of the roof. Air exits through a low-profile mesh or baffle protected from rain. Ridge vents are nearly invisible from the ground and provide even exhaust along the entire roof line.
- How it works: Natural convection. Warm air rises through the ridge.
- Cost: $400 to $800 installed during a roof replacement, $1,200 to $2,000 standalone.
- Best for: Most PNW homes. The default exhaust solution.
- PNW rating: Excellent.
Box Vents (Static Vents)
Individual square or rectangular vents installed near the ridge. They provide spot exhaust but create dead zones between them.
- How it works: Passive convection through individual openings.
- Cost: $50 to $100 each installed. A typical home needs 4 to 8 vents.
- Best for: Roofs without continuous ridges, or supplementing ridge vents on complex rooflines.
- PNW rating: Good as supplement, fair as primary exhaust.
Soffit Vents
Intake vents installed under the eaves. They are essential for any balanced ventilation system. Without intake, no exhaust system can work properly.
- How it works: Air enters at the eaves, rises through the attic, exits at the ridge.
- Cost: $300 to $600 for full perimeter installation during a roof project.
- Best for: Every home. Soffit vents are the foundation of balanced ventilation.
- PNW rating: Essential.
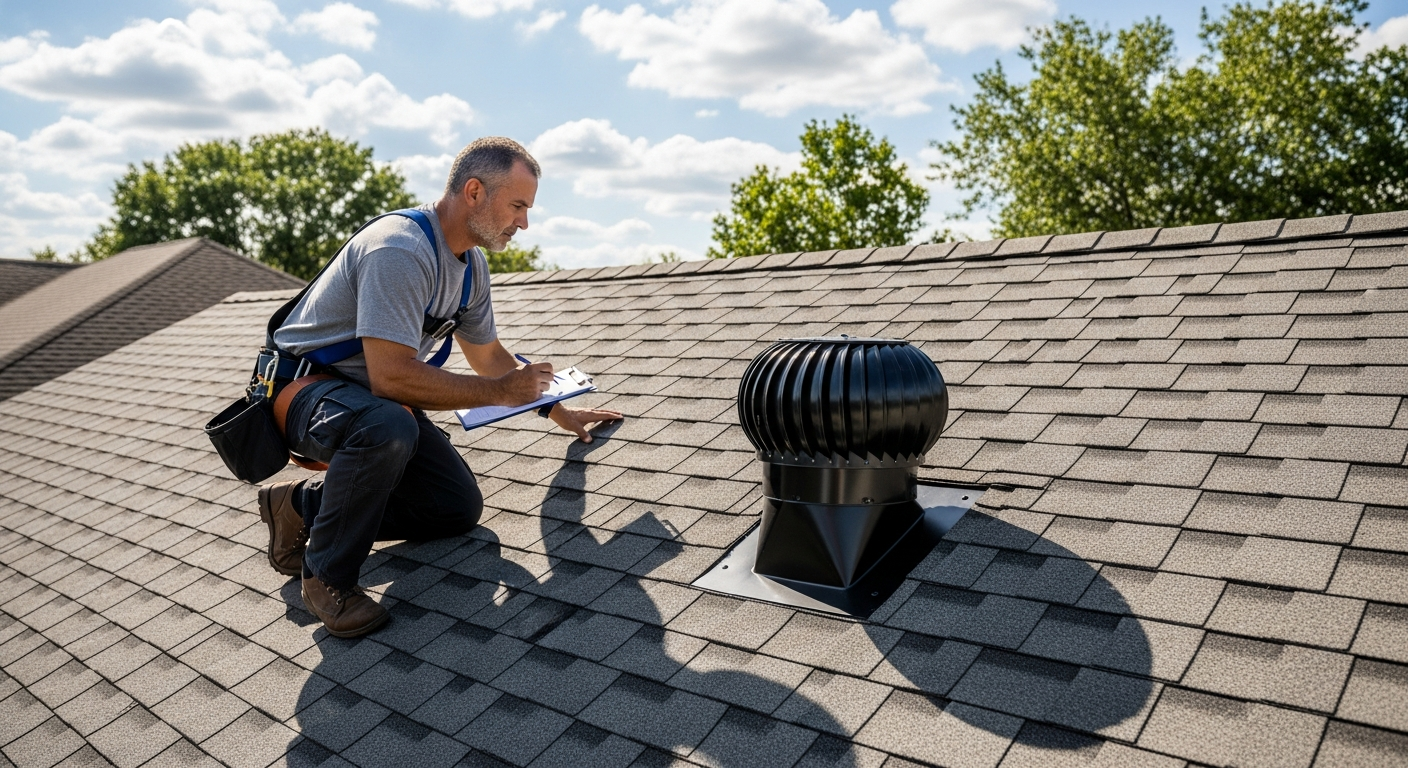
Turbine Vents
Wind-powered spinning vents that create suction as they turn. They look like silver ice cream cones on the roof.
- How it works: Wind spins the turbine, drawing air out of the attic.
- Cost: $100 to $200 each installed.
- Best for: Windy locations where ridge vents are not practical.
- PNW rating: Fair. Cheap units can leak in heavy rain. PNW wind is often too light to spin them effectively in summer.
Powered Attic Fans
Electric or solar-powered exhaust fans mounted on the roof or in a gable wall. High airflow capacity, but with significant downsides.
- How it works: Fan motor pulls air out of the attic.
- Cost: $300 to $600 each installed, plus electrical work.
- Best for: Specific situations like supplemental cooling for unconditioned upper-floor rooms in unusually hot climates.
- PNW rating: Situational, often counterproductive. Can pull conditioned air from your home and reverse passive airflow.
Gable Vents
Decorative vents on the gable ends of the house. They were the standard ventilation method before ridge vents became common.
- How it works: Cross-flow ventilation between two gable vents.
- Cost: $100 to $200 each installed.
- Best for: Older homes that already have them. Not recommended as a primary system on new roofs.
- PNW rating: Fair. Can short-circuit ridge-and-soffit airflow when mixed.
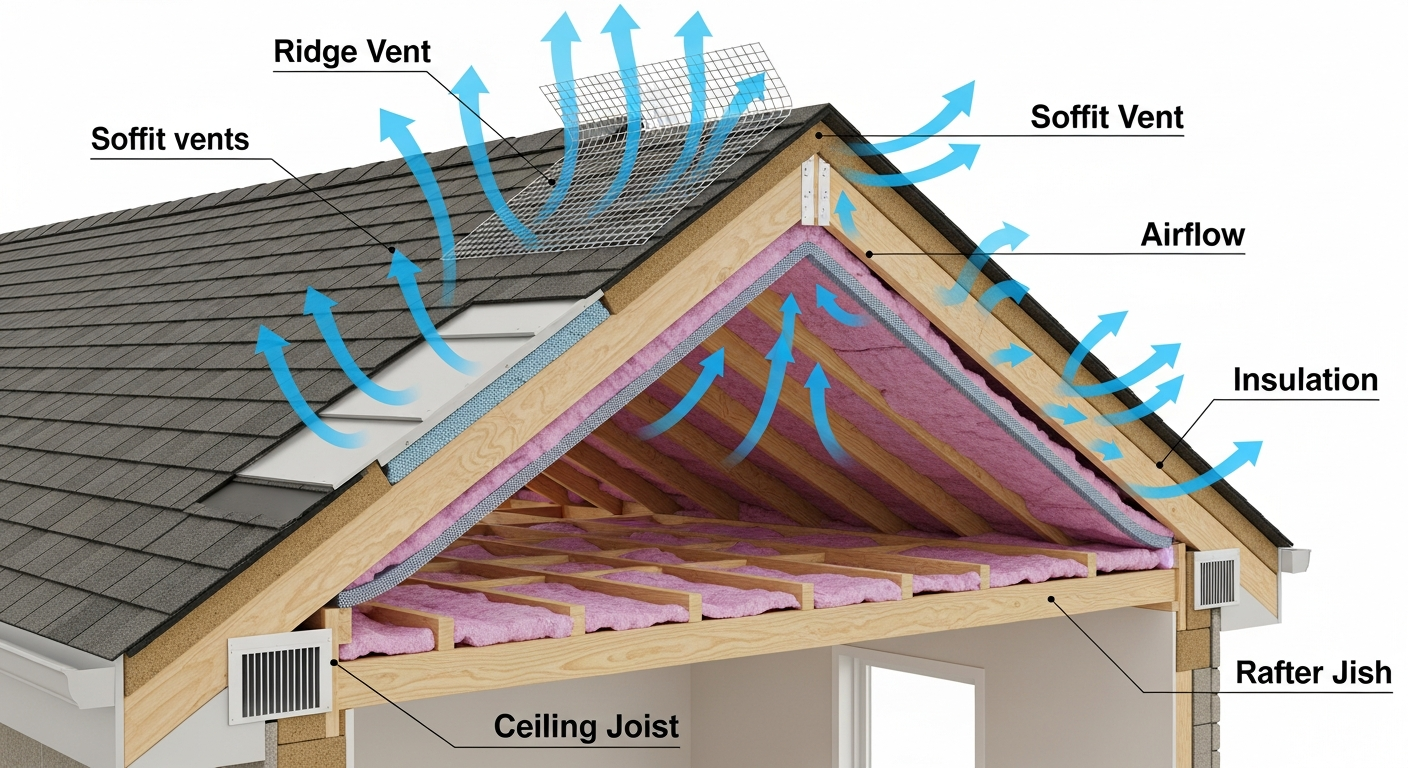
How Balanced Ventilation Works
Balanced ventilation means equal intake area and exhaust area. The principle is simple: air enters through soffit vents at the eaves, warms as it rises through the attic, and exits through ridge or box vents at the peak. This creates continuous, gentle airflow that pulls moisture and heat with it.
When intake and exhaust are unbalanced, the system fails in predictable ways:
Too much exhaust, not enough intake. The exhaust vents pull air from wherever they can find it, including through your ceiling and into the attic from your conditioned living space. This creates negative pressure, raises your heating and cooling bills, and can pull moisture-laden indoor air directly into the attic.
Too much intake, not enough exhaust. Air enters but cannot leave efficiently. Pressure builds, airflow stalls, and the ventilation system stops removing moisture.
Mixed exhaust types. This is the most common professional mistake. Combining ridge vents with powered fans or gable vents creates short-circuit pathways. The fan or gable vent pulls air down through the ridge instead of from the soffits, defeating the entire system.
The ideal PNW system is the simplest: continuous soffit vents at the eaves, a continuous ridge vent at the peak, and nothing else competing for airflow.
Signs Your Home Has Poor Roof Ventilation
You can identify most ventilation problems without climbing on the roof. Walk through your home with a flashlight and check for these signs.
In the attic:
- Visible mold or mildew on rafters, sheathing, or insulation
- Dark staining on the underside of the roof deck
- Condensation on metal surfaces, nails, or attic windows
- Musty or mildew smell
- Damp or matted insulation
- Frost on the underside of the deck during cold weather
In the living space:
- Upper floors significantly hotter than lower floors in summer
- Peeling or blistering exterior paint near the roofline
- Higher than expected energy bills
- Recurring ice dams at the eaves during cold snaps (rare in Seattle but a clear signal)
- Water stains on upper-floor ceilings, especially near exterior walls
On the roof:
- Shingle granules in gutters earlier than expected (10 to 15 years instead of 20+)
- Curling, cupping, or cracking shingles before the warranty period
- Visible sagging in any roof section
- Missing or damaged ridge or soffit vents
If you spot two or more of these signs, your ventilation system is likely inadequate. Schedule a professional inspection to confirm and to map out an upgrade plan.
How Proper Ventilation Extends Roof Lifespan
Moisture trapped between shingles and sheathing is invisible from the surface but devastating over time. The asphalt binder in composition shingles softens and degrades when constantly damp. Wood shake and shingles absorb moisture directly, swell, then crack when they dry. Metal panel fasteners corrode from condensation underneath.
For composition shingles, proper ventilation typically adds 5 to 10 years of usable lifespan. A 30-year shingle in a properly ventilated attic often lasts 28 to 32 years. The same shingle in a poorly ventilated attic often fails at 15 to 20 years.
For wood shake and shingles, the impact is even more dramatic. Cedar absorbs moisture directly, and without ventilation it rots from beneath while still looking acceptable on top. A cedar shake roof that should last 30 years can fail at 18 to 20 with bad ventilation.
For metal roofing, the issue is less about the metal itself and more about fasteners and the deck below. Condensation on the underside of metal panels rusts the screws and rots the deck, eventually causing leaks at the seams.
K Single Corp regularly inspects roofs that should have lasted decades but are failing at 15 years. In nearly every case, poor ventilation is the root cause. New shingles will not solve the problem if the underlying moisture issue stays in place.
Ventilation and Insulation Work as a System
Ventilation and insulation are two halves of the same system. Insulation keeps conditioned air in your living space. Ventilation keeps the attic above the insulation dry and temperature-neutral. Get one wrong and the other suffers.
The most common mistake in PNW homes is adding insulation without checking ventilation. More insulation blocks soffit vents, blocks airflow, and traps more moisture in the attic. The homeowner’s energy bills go up because the HVAC works harder against a hotter, wetter attic.
The fix is straightforward: install soffit baffles. These rigid foam or plastic channels sit between the rafters at the eaves, keeping a clear airflow path above the insulation. They are inexpensive (under $5 per bay) and should be installed any time insulation is upgraded.
Vapor barriers are the third part of the system. Washington code requires a vapor barrier on the warm side of insulation in western Washington. The vapor barrier prevents indoor moisture from reaching the attic in the first place. Combined with proper ventilation, it dramatically reduces condensation problems.
The ideal attic in a Seattle home looks like this:
- R-49 insulation across the attic floor (current WA code for new construction)
- Continuous vapor barrier on the warm side (between drywall and insulation)
- Soffit baffles maintaining clear airflow channels above the insulation
- Continuous soffit vents at the eaves
- Continuous ridge vent at the peak
- No powered fans, no gable vents fighting the system
WA State Code Requirements for Roof Ventilation
Washington Residential Code Section R806 establishes ventilation requirements for residential attics.
Standard requirement (R806.1): 1 square foot of net free ventilation area per 150 square feet of attic floor. “Net free area” accounts for screens and baffles that reduce actual airflow compared to the raw vent opening.
Reduced requirement (R806.2): 1:300 ratio is allowed when both conditions are met:
- A Class I or II vapor barrier is installed on the warm side of the insulation, and
- At least 40% but not more than 50% of the required ventilation is provided by upper exhaust vents (ridge or near-ridge), with the balance provided by soffit/eave intake vents
Unvented attic assemblies (R806.5): These are allowed but require very specific construction details, including air-impermeable insulation against the underside of the deck and dewpoint control. They are uncommon in residential retrofits.
Local jurisdictions can amend these requirements. Some King County cities have additional ventilation provisions for new construction. Always check with your contractor about current local requirements.
Code is the floor, not the goal. For PNW moisture management, exceeding code by 20 to 30% is a smart investment.
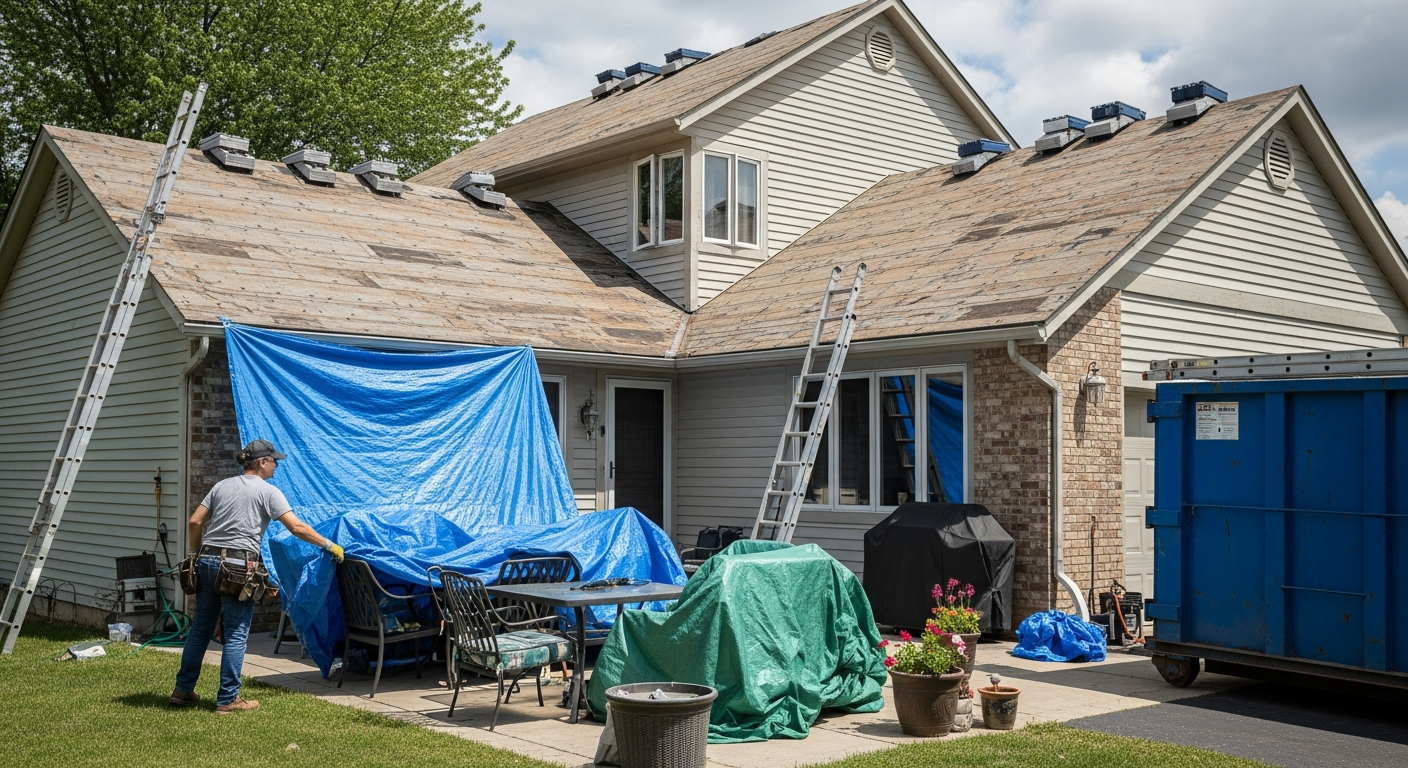
The Best Time to Upgrade Ventilation
The cheapest, easiest time to upgrade ventilation is during a roof replacement. The roof is already open, the crew is already on site, and the incremental cost is small compared to a standalone project.
Cost during a roof replacement:
- Adding a continuous ridge vent: $400 to $800
- Adding or upgrading soffit vents: $300 to $600
- Installing soffit baffles for insulation: $200 to $400
Cost as a standalone project:
- Continuous ridge vent installation: $1,200 to $2,000
- Soffit vent retrofitting: $800 to $1,500
- Soffit baffles in an existing attic: $400 to $800
The math is dramatic. Bundled with a roof replacement, full ventilation upgrades typically add $1,000 to $1,800. Done separately later, the same upgrades cost $2,500 to $4,500.
If your roof is more than halfway through its expected lifespan, plan to upgrade ventilation during the next replacement. If your roof has 5+ years of life remaining and you have visible ventilation problems, a standalone upgrade is often the right call.
K Single Corp inspects ventilation as part of every roof estimate. If your existing system is inadequate, we identify the gaps, recommend upgrades, and price them transparently as part of your project.
Schedule a Free Roof and Ventilation Assessment
If you have noticed mold in your attic, hot upper floors, peeling exterior paint near the roofline, or any other ventilation warning signs, a professional assessment is the next step. K Single Corp inspects roof and attic ventilation across King, Snohomish, and Pierce counties at no cost when paired with an estimate.
Schedule your free assessment or call (206) 659-4349 to talk through your situation.
For more on related topics, see our guide on how to assess roofing lifespan and our overview of roof installation services. If you are considering a roof replacement, our residential roofing service page covers the full scope of work, and the shingle roofing, metal roofing, and cedar shake detail pages explain how ventilation requirements differ by material.